Outdoor Kitchen Design Ideas: A Contractor's Practical Guide
A contractor's take on outdoor kitchens: how to lay one out around real cooking, which materials survive winter, and the utility decisions people wish they'd made before pouring the slab.

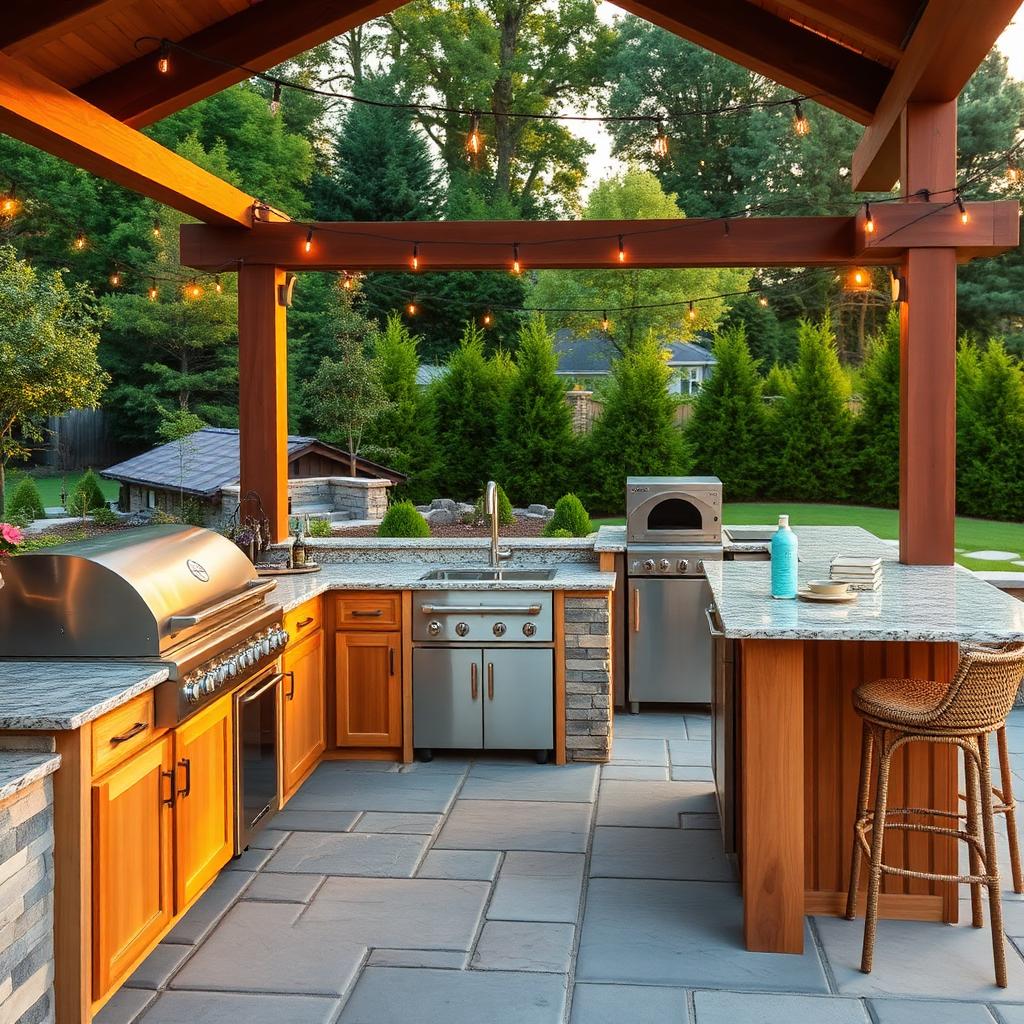
Most outdoor kitchens I get called back to fix have the same problem: they were designed as a piece of furniture instead of a working kitchen. The grill is beautiful, the stone veneer is beautiful, and the client can't actually cook a full dinner out there because there is nowhere to set a hot pan down and the nearest outlet is thirty feet away in the garage.
An outdoor kitchen is a kitchen first and an outdoor space second. Every good one I have built in the last decade follows the same short list of rules — enough counter on both sides of the heat, utilities run before the concrete cures, materials that dry out fast, and a roof or pergola sized around the cook, not the grill. Do those four things right and you get a space you use three seasons of the year. Skip any of them and you get an expensive backdrop for photos.
Start with the cook, not the grill
Before I draw a single line, I ask the client to walk me through a real meal they want to make outside. Not "burgers," — a specific Sunday: what goes on the grill, what needs to rest, where the sides come from, where the drinks live, who is helping. Ninety percent of layout problems solve themselves when you design around that story.
The most useful outdoor-kitchen dimension nobody talks about is the landing zone: the counter on either side of your heat source. Building codes and manufacturers recommend at least twelve inches of non-combustible counter on each side of a grill, but for actual cooking you want closer to twenty-four. That is where the platter of raw chicken sits before it hits the grate, and where the finished steaks rest under foil. Skimp here and you will be juggling hot food over a firebox.
If more than one person cooks, add a prep zone that is physically separate from the grill. A three-foot run with a sink, cutting board and small under-counter fridge lets a second person work without leaning across open flame. In small yards I will shrink the bar seating before I shrink the prep zone — you can eat anywhere; you can only prep where the water is.
The four layouts that actually work
Almost every outdoor kitchen I build is a variation on one of four layouts, and the right one is dictated by the yard, not by taste. A straight run along a house wall is the cheapest and easiest — you tie into existing utilities, and the wall does the work of a backsplash. It works well for grills up to about six feet with a small side burner.
An L-shape is my default for real cooking. One leg holds the grill and a warming drawer; the other holds prep, sink and refrigeration. The inside corner becomes the natural landing zone. Keep the total run under about fourteen linear feet or the walk between stations gets long enough to bother you.
A U-shape or three-sided island is the layout to build when the yard is big and the cook wants to face guests. It is the most expensive because you are finishing four sides and running utilities across the middle, but it turns the kitchen into a room. Leave at least forty-two inches between opposing counters — thirty-six feels tight the first time you carry a sheet pan through.
A galley — two parallel runs with a walkway between — is underused and often the smartest choice under a covered porch. Grill and heat live on the outside run; prep and refrigeration live on the inside run against the house, where they are protected. Do not put the sink on the same run as the grill; you want water and fire on opposite sides of the cook.
Utilities: the decisions you cannot undo
The single most common regret I hear is "I wish we had run more before we poured." Once the slab is in and the veneer is up, adding a gas line or a dedicated circuit means demolition. Spend a weekend before construction thinking about every utility you might ever want, then run conduit for the ones you are not installing today.
Gas is almost always worth it over propane if the house has natural gas at the meter. A licensed plumber will size the line for the total BTU load of every appliance you plan to add — grill, side burner, pizza oven, patio heater — plus about twenty percent headroom. Do this once, correctly, and you never touch a tank again.
Electrical needs more circuits than people expect. A refrigerator wants its own dedicated 20-amp circuit on GFCI. Any high-draw appliance — an electric pizza oven, an ice maker, an induction burner — wants its own too. Countertop outlets need to be GFCI-protected and spaced so nothing lives on an extension cord. Under a roof, run circuits for task lighting over the counters and separate switching for ambient string lights.
Water is where DIY jobs go wrong. If you live anywhere that freezes, the supply line has to be insulated, sloped and equipped with a frost-free hose bib or an interior shut-off you can drain in fall. The drain is worse: an outdoor sink is not allowed to dump onto the ground in most jurisdictions, and it usually cannot tie into a storm drain. Plan on a proper tie-in to household waste with a trap and vent, or accept that your sink is really a rinse-only setup.
Materials that survive real weather
Everything outside is a moisture problem waiting to happen. The material choices that hold up over ten years are almost never the ones that photograph best on day one.
For the cabinet boxes, marine-grade polymer (HDPE) and powder-coated stainless steel are the only two I install in wet climates now. Both shed water, will not rot and can be pressure-washed. Teak and cedar look beautiful for two seasons and then start a maintenance schedule you will resent. If a client insists on wood, I use it only for doors and drawer fronts under a solid roof, and I seal every cut edge.
For counters, honed granite is my default. It is dense, it does not need annual sealing the way polished granite does, and heat does not bother it. Porcelain slabs are the newer alternative — thinner, lighter, and available in patterns that mimic marble without the staining. Avoid quartz outdoors: the resin binder yellows in direct UV and the manufacturers explicitly do not warrant it for exterior use. Concrete counters look great and will hairline crack; if you can live with that patina, they are fine.
For the base or veneer, real stone and full-thickness brick outlast every faux product I have installed. Manufactured stone veneer works if it is installed with a proper drainage plane and weep screed behind it — installed wrong, it traps water against the framing and blows out in three winters. Insist on the manufacturer's exact installation detail, in writing, and hire someone who has done it before.
The appliances worth the money
You do not need every appliance in the showroom. You need a good grill, cold storage close to the grill, and one specialty piece that matches how you actually cook.
The grill is where I tell clients to spend. A well-built 36-inch built-in gas grill from a real outdoor manufacturer will outlive two or three of the box-store equivalents, and the interior components — burners, grates, flame tamers — will still be available in ten years. Cheap grills rust from the inside within four seasons in a coastal or humid climate.
An under-counter refrigerator earns its keep the first time you do not walk into the house for a beer. Buy one rated for outdoor use — the compressor and gasketing are different — and give it its own circuit. A separate ice maker is a luxury; a good insulated cooler drawer is a smart middle ground.
The specialty piece is personal. A wood-fired pizza oven if you actually make pizza; a kamado-style ceramic cooker for low-and-slow barbecue; a flat-top griddle for anyone who cooks breakfast for a crowd; a rotisserie burner for whole birds. Pick the one you will use twenty times a summer, not the one that looks impressive in the photo.
Shelter, lighting and the shoulder seasons
A pergola with an open top looks nice and does very little. If you want an outdoor kitchen you use in April and October — the shoulder seasons that quietly determine whether you got your money back — you need a solid or louvered roof over the cook.
A solid roof also unlocks better lighting, ceiling fans and radiant heaters. Downlights over the counters give you real task light for evening cooking; a warm ambient layer over the seating keeps the space from feeling like a work zone. On dimmers, always. In cold climates, mount infrared heaters overhead and aim them at where people sit; they warm bodies, not air, and they work down into the forties.
For ventilation, any grill installed under a roof needs a listed vent hood sized to the appliance and ducted to the outside. This is not optional and it is not a place to save money — the CO and grease load from a real grill will discolor a ceiling in one season without proper venting.
Drainage, code and the boring stuff that saves you
The finished slab needs to slope away from the house at roughly a quarter-inch per foot. Water that sits at the base of cabinets is what causes the failures I get called back for — swollen doors, rusted hinges, mold behind veneer. Get the pitch right before anyone lays a single tile.
Check local code before you finalize the layout. Setback from the property line for a gas appliance, clearance from combustibles, the required distance between a grill and any overhang, and permit requirements for gas and electrical work all vary by jurisdiction. Pulling permits feels like friction; it also means an inspector catches the things your contractor missed before they are hidden behind stone.
Finally, plan for winterization from day one. Every water line needs a drain point. Every appliance needs a cover that actually fits. The refrigerator either comes inside or gets left running on a dedicated circuit. Written down as a two-page checklist and taped inside a cabinet door, this is what makes an outdoor kitchen last fifteen years instead of five.
Expert tips
- •Rough in one more gas stub and one more electrical circuit than you think you need — capping unused utilities costs almost nothing now and thousands later.
- •Insist on a written installation detail for any manufactured stone veneer, including the drainage plane and weep screed behind it.
- •Buy the grill and refrigerator first, then design the cabinet openings around their exact cut-out dimensions, not the other way around.
- •Under any roof or pergola with a solid top, install a properly sized vent hood ducted outside — treat this as non-negotiable, not an upgrade.
- •Slope the slab a quarter-inch per foot away from the house before anyone starts laying finish material.
Common mistakes to avoid
- ✕Undersizing the landing zones on each side of the grill so there is nowhere to set hot food down.
- ✕Choosing quartz counters for a sunny patio and watching them yellow within two summers.
- ✕Running a single circuit for the whole kitchen and tripping the breaker every time the fridge and grill igniter fire together.
- ✕Building a beautiful open pergola in a climate with real weather and using the space nine days a year.
- ✕Skipping the drain for the sink and ending up with a rinse-only setup you resent after the first party.
Frequently asked questions
Sources & further reading
- NFPA 58 — Liquefied Petroleum Gas Code — National Fire Protection Association
- International Residential Code, chapters on outdoor appliances and gas — International Code Council
- HPBA outdoor appliance installation guidelines — Hearth, Patio & Barbecue Association
- Manufacturer installation manuals: Lynx, DCS, Wolf, Kalamazoo built-in grill lines — Grill manufacturers
Editor's note: Marcus is a licensed general contractor who has built outdoor kitchens in freeze and coastal climates for more than a decade. The materials and utility recommendations here reflect what he installs in his own projects, not sponsored product lists.
Licensed general contractor turned writer. Twenty-two years on job sites; still keeps a tool belt in the truck.
More in Gardening & Outdoor Living
Outdoor Patio Design Ideas You'll Actually Use All Summer
Patio ideas built around real use — shade, seating and lighting choices that keep you outside past week one.
Beginner Gardening Guide: Start Small and Keep It Alive
The plants that forgive first-timers, the tools that actually matter, and the mistakes worth skipping in your first growing season.
Building a Raised Garden Bed: A Weekend Project That Lasts a Decade
A step-by-step raised bed plan that keeps its shape for years, drains properly and grows vegetables that outperform anything from a store-bought kit.
Related topics
Ideas from nearby corners of the site you'll probably like too.
The Complete Bathroom Renovation Guide: Costs, Timeline and What Actually Happens
Everything I wish homeowners knew before their first bathroom remodel — realistic budgets, a full timeline, decisions that quietly add thousands, and the small choices that make the finished room feel worth every penny.
Composting at Home: A Beginner's Guide to Turning Kitchen Scraps Into Garden Gold
Composting sounds intimidating until you actually start. This is the honest, no-nonsense guide I wish I'd had — what really matters, what doesn't, and how to end up with rich dark compost instead of a smelly pile of regret.
Best Indoor Plants for Air Quality (and How to Not Kill Them)
Honest picks for indoor plants that clean the air, add real warmth to a room, and forgive a beginner's care routine.